In
Agile PLM 9.3.1 we added SDK and Web Service calls to retrieve XML from
Agile PLM. We also created samples to
demonstrate how to leverage the XML with BI Publisher to create Documents like
Data Sheets, SCAR reports, and custom BOM reports. This Document
Publishing capability has been extensively leveraged by our Pre-Sales team and
customers to generate dynamic documents in all of these areas.
![]()
At
OVCS 2014, Larry Recht from our Pre-Sales team presented a fresh take on
Document Publishing using an unpublished script. We have now published the
Single Object Document Publishing script with our
9.3.1.2 Document
Publishing Sample
This new sample script enables you to automatically create documents like the
examples above using BI Publisher. This
Blog post walks you through using Single Object Document Publishing.
Background on Document Publishing
![]()
As Larry discussed in his OVCS presentation, there are 3 main steps to Document Publishing. Our goal is to take live data from Agile PLM and generate a document with it. We need to use these 3 steps to come up with the document.
Collect PLM Data
PLM Data are attributes you see in Web Client. PLM Data includes Part Number, Part Description, other Title Block or Cover Page Fields, as well as tables like Change History, BOM, Affected Items, etc. For Document Publishing, all of this PLM Data is exported as an XML file using SDK or Web Service calls.
Collect Publishing Template
BI Publisher requires a Template to figure out how to use the PLM Data XML file. For our sample programs, this template is stored as an attachment to an object in Agile PLM. Users wanting to create templates must install BI Publisher Desktop and then create a Template in Microsoft Word. Using the right tools is very important for the next step.
BI Publisher Creates a File
With the PLM Data XML file and a Publishing Template, BI Publisher can create an incredible variety of output documents. Agile PLM has an internal copy of BI Publisher that we use in our samples. In this sample, once a document is created it is attached back to Agile PLM.
Single Object Sample
The remainder of this document goes through setting up and running the single object sample script. This script performs the 3 steps mentioned above that are required for Document Publishing. The previous samples created a complex set of related objects and tended to confuse users. The new sample is much less complex and offers flexible configuration options.
Running the Single Object Sample for the First Time
Do the following on a test or QA server. Do not run any new program for the first time on your production server. It will help if you have some experience with Agile PLM events and SDK programming, but that experience is not required. Heed the instructions from Douglas Adams and Don't Panic! If you think it worthwhile, keep your towel handy.
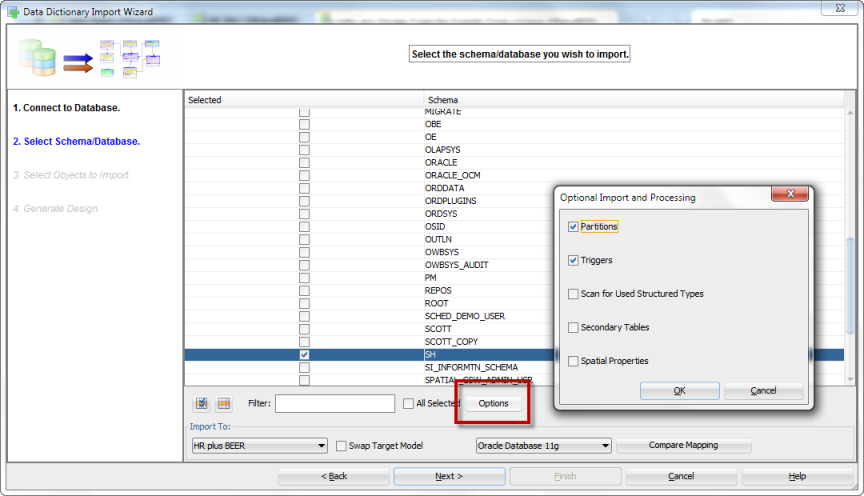
Download the 9.3.1.2 Document Publishing Sample and extract DocumentPublishingSingleObject.groovy (in the DocumentGenerationJava folder within OAS or WLS folders). Open the script in a text editor. At the top of the script there are many variables to control document publishing. There are 3 you must update to match your system:
- TEMP_PATH - this must be a real folder on your server. Talk to your System Administrator. For Windows, a path like c:/temp/ is typical. Note that the forward slashes work fine. For Linux, the path is likely /tmp/. Your System Administrator may want to give you a specific subdirectory. The script will place temporary files into this directory in order to create documents.
- TEMPLATEHOLDER - this must be a real Object in your Agile PLM system that will have the Template attached. In the unmodified script, this is a Document called BIPUB-000002-TMP.
- FILTER - this must be a real ACS filter in your Agile PLM system. We recommend keeping this filter at a minimum (just Page 1, 2, 3) for your first try. In the unmodified script this is "Default Quality Change Request Filter". The comment in the script mentions this is an API Name, but the full name works.
Install Word and BI Publisher Desktop. If you are running 9.3.1.x or 9.3.2, use BIP Desktop 10g. For 9.3.3, use BIP Desktop 11g. This installation will add some menus into Word ADD-INS. Don't worry about those for now. Create a new file in Word, add some simple text (HELLO WORLD!), and save as the file as RTF (template.rtf). Attach template.rtf to your TEMPLATEHOLDER in Agile PLM.
The next steps require administrator privileges to setup a new event to trigger the script by creating an Event Handler (the code), an Event (the trigger), and an Event Subscriber (telling Agile PLM which code to run against the trigger). Open Java Client, select the Admin tab, open System Settings > Event Management and perform the next steps.
- Open Event Handlers node, create a new Handler of type Script PX with a name (Test Doc Publishing). In the script box, replace the contents with the script. Note: one easy method is to return to the text editor with the script open, select all the contents (Ctrl A), Copy (Ctrl C), then return to Java Client in the Script box, select all and paste (Ctrl V). Select Ok to complete creating the Event Handler.
![]()
- Open Events node. Create a new Event of Type Extend Actions Menu with a name like "Create Document." Choose the class where you wish to trigger the Document Publish, for example all Quality Change Requests. Select Ok.
![]()
- Open the Event Subscribers node. Create a new subscriber, skip down to Event and choose the new one "Create Document", then choose the new Event Handler "Test Doc Publishing", now select the generate button (123) next to Name, change Execution Mode to Synchronous, and select Ok. You should now have an Event Subscriber called "Create Document Test Doc Publishing".
![]()
The Event system is setup, so now we need to trigger this process for the first time.
Return to Web Client and open an object of the class you selected when creating the Event, in this example a CAPA. Make sure there is content in the CAPA Cover Page fields; the exported XML will only contain fields with values. In order to see the results of the script, select the Attachments tab.
Now trigger the event by selecting Actions Menu - "Create Document". Within a minute, you should see 2 attachments, a PDF and XML, with the Object Number as the filename. The PDF will contain the simple text (HELLO WORLD!), while the XML file will contain the dynamic contents of the object.
![]()
Congratulations! You have completed the first step to creating a real document. If the documents never showed up, proceed to the Troubleshooting section. If the documents appeared, move on to the next section.
Improving the Template to create a Real Document
The next step is to improve the template with references to the Agile PLM attributes using BI Publisher Desktop. When you installed BI Publisher Desktop, a Tutorial document (Template Builder for Word Tutorial.doc) was added to the installation directories (C:\Program Files (x86)\Oracle\BI Publisher\BI Publisher Desktop\Template Builder for Word\doc). I recommend you read that document, but the following steps should get you through some basics.
If you skipped the step to install BI Publisher Desktop, please download and install the software now. The screen caps below are from BIP 11g. Earlier versions look a little different but have the same capabilities.
Download the Object XML file to your computer using Get on the Attachments tab. Return to Word and open template.rtf. In Word, select the BI Publisher tab to open the ribbon for BI Publisher. In the middle of the ribbon there is an open folder icon with the words "Sample XML" underneath. Click on Sample XML, select the Object XML file you downloaded, then select Ok. After a short time, Word should popup a message "Data loaded successfully."
![]()
Next select the Field button on the ribbon to open the Field dialog. This dialog will show all the XML tags that were loaded. Select each of the tags you want to add and then select the Insert button.
![]()
Add static text and format the text and tags using normal Word features. Save the RTF file. BIP has a preview feature, so select the PDF button to generate a preview of the data in your template. Continue to alter the template, save and preview until you are happy with the results.
![]()
Return to Agile PLM web client and replace the Template RTF file on your Template Holder with your new one. This can be done using Check Out / Check In or by delete / add.
Run Create Document to regenerate the PDF file on your object. You should see the same results as using Preview in Word.
Congratulations - you are done learning how to use the single object Document Publishing script!! Next steps are to review the BI Publisher guides and learn more about what you can do in BI Publisher to create a real document for your company.
Good luck and Happy Publishing!
Script Configuration and Extensions
This script has many options for configuration stored as variables in the class Global. A few are mentioned here to make you aware of them. Change these options in the Event Handler directly or in the text editor to replace in the Event Handler.
- Disable attaching XML file by setting ATTACH_XML to NO.
- Disable sending debug messages to Weblogic logs by setting DEBUG to NO.
- Change whether the script checks in new versions of Documents or adds new Documents by changing ATT_NEW_ROW.
- DOCUMENT_FILENAME and DOCUMENT_FILENAME_DESC. Edit these variables to change the filename and file description. Review the getKeyValue function in the script for other available constants.
- DYNAMIC_ATTRIBUTES. If this is set to Yes, the script will read the template holder, filter, and output format from the Object attributes. The published whitepaper uses Dynamic Attributes.
Since this is simply a Java program, you also have many options to improve it. One example is if you plan to implement many Document Publishing use cases but don't want to use Dynamic Attributes. You could add a case statement to pick the Template and Filter based on object type. Otherwise you will need to simply copy the Event Handler multiple times to support the different cases.
The SDK call used by our sample is exportWXMLData. The Web Service call is loadXMLData. For integration programmers, the XSD schema for each object class is retrieved using SDK exportWXMLSchema or Web Service loadXMLSchema.
Troubleshooting
Troubleshooting issues can be challenging. Below is a basic introduction to get you started.
Fixing Problems on First Run with an empty template
First, did you change the Variables to valid information? The TEMP_PATH must exist on the server, the TEMPLATEHOLDER must be a valid object with the Template RTF file, and the FILTER must exist in Admin > System Settings > Agile Content Service > Filters. Remember that the Export calls need this Filter to determine what content to output.
You can correct the script information directly in the Event Handler screen, or edit in your text editor and replace the entire text in the Script section of the Handler and save the changes.
Make sure you actually attached an empty or very simple template.rtf as described to the TEMPLATEHOLDER. If any of this was wrong and is now corrected, go try Actions > Create Document again.
More General Troubleshooting
If the path, template, and filter are all correct, we need to explore more ways to see where this process could have failed, including the Event Handler Monitor and Server Logs.
In Admin you should still have the Event Subscriber open (Create Document Test Doc Publishing). Select the tab "Monitor" on this Subscriber. You will see a list of all the times the Subscriber has been invoked. You should be able to see whether the Handler completed or threw an error message. Double click on a row to open it. If needed, switch tabs by clicking on General Information and back to Monitor tabs, then double click a row to open it. Even if the Handler completed, it could have still thrown messages into the Weblogic console or logs.
The script as shipped prints Debug information into the Server Logs. Re-establish your friendship with the System Admin and get direct access to the Logs. Review the latest information and start correcting any reported errors. When building out Document Publishing demos, our pre-sales team often runs the App Server in a CMD console so the messages appear immediately. If you are still having issues, review the log messages and try to correct the reported problems.
BI Publisher Compatibility
As referenced earlier, 9.3.3 uses a different version of BI Publisher (11g) than earlier Agile PLM versions. We do recommend you use the compatible version of BIP. However, some customers have installed BIP 11g to build templates that they try to run on Agile PLM 9.3.1 or 9.3.2. If you need to run BIP 11g Desktop to develop templates for 9.3.1 or 9.3.2, you must open Options > Options > Build and select Backward Compatible radio button in the Form field size section. Any existing tags will be setup incorrectly, so Insert new tags throughout your template before using the template. If your template is built incorrectly, you will get errors creating a final document.
BIP 10g and 11g also use different class paths. Since our script calls BIP directly, you will need to change the path statements to run the script on 9.3.2 or 9.3.1. We added both statements to the script, so make sure to uncomment the 10g and comment out the 11g statements for the older version. If the wrong class path is used, you will see errors in the log.
// Import statements for BI Publisher 10G embedded in Agile PLM 9.3.2 and lower. Uncomment for Agile PLM 9.3.2 and lower.
// import oracle.apps.xdo.template.FOProcessor;
// import oracle.apps.xdo.template.RTFProcessor;
// import oracle.apps.xdo.XDOException;
// Import statements for BI Publisher 11G embedded in Agile PLM 9.3.3 and higher. If running 9.3.2 or lower, comment out these lines.
import oracle.xdo.template.FOProcessor;
import oracle.xdo.template.RTFProcessor;
import oracle.xdo.XDOException;
Thanks go out to Bob Schwartz and Larry Recht in our Pre-Sales team for helping improve this script and communicate this great functionality to our customers.


 Who’s writing and managing your


 In the first book, which is a completed book on Leanpub, entitled "
 The second book is, if anything, even more interesting. Its value proposition lies in your involvement with its writing. It is not a complete book. It is called "
 Vert.x
 There is a brand new white paper available that will be of interest to anybody contemplating a database and/or application migration from AIX to Solaris.
  SOA Community
![clip_image001[1]](http://soacommunity.files.wordpress.com/2014/02/clip_image0011.jpg "clip_image001[1]") SOA Community
SOA Community SOA Proactive
![clip_image001[2]](http://soacommunity.files.wordpress.com/2014/02/clip_image0012.jpg "clip_image001[2]") SOA Community
SOA Community![clip_image001[3]](http://soacommunity.files.wordpress.com/2014/02/clip_image0013.jpg "clip_image001[3]") SOA Community
SOA Community

![clip_image001[4]](http://soacommunity.files.wordpress.com/2014/02/clip_image0014.jpg "clip_image001[4]") SOA Community
SOA Community![clip_image001[5]](http://soacommunity.files.wordpress.com/2014/02/clip_image0015.jpg "clip_image001[5]") SOA Community
SOA Community![clip_image003[1]](http://soacommunity.files.wordpress.com/2014/02/clip_image0031.jpg "clip_image003[1]") OTNArchBeat
OTNArchBeat AVIO Consulting
![clip_image001[6]](http://soacommunity.files.wordpress.com/2014/02/clip_image0016.jpg "clip_image001[6]") SOA Community
SOA Community![clip_image001[7]](http://soacommunity.files.wordpress.com/2014/02/clip_image0017.jpg "clip_image001[7]") SOA Community
SOA Community![clip_image005[1]](http://soacommunity.files.wordpress.com/2014/02/clip_image0051.jpg "clip_image005[1]") AVIO Consulting
AVIO Consulting Lucas Jellema
 Dain Hansen
 Oracle SOA
![clip_image001[8]](http://soacommunity.files.wordpress.com/2014/02/clip_image0018.jpg "clip_image001[8]") SOA Community
SOA Community Debra Lilley
![clip_image008[1]](http://soacommunity.files.wordpress.com/2014/02/clip_image0081.png "clip_image008[1]") Oracle SOA
Oracle SOA![clip_image001[9]](http://soacommunity.files.wordpress.com/2014/02/clip_image0019.jpg "clip_image001[9]") SOA Community
SOA Community Edwin Biemond
 Redfaire
![clip_image001[10]](http://soacommunity.files.wordpress.com/2014/02/clip_image00110.jpg "clip_image001[10]") SOA Community
SOA Community![clip_image001[11]](http://soacommunity.files.wordpress.com/2014/02/clip_image00111.jpg "clip_image001[11]") SOA Community
SOA Community Luis Augusto Weir
 Yogesh Sontakke
![clip_image008[2]](http://soacommunity.files.wordpress.com/2014/02/clip_image0082.png "clip_image008[2]") Oracle SOA
Oracle SOA Peter Lorenzen
![clip_image001[12]](http://soacommunity.files.wordpress.com/2014/02/clip_image00112.jpg "clip_image001[12]") SOA Community
SOA Community![clip_image001[13]](http://soacommunity.files.wordpress.com/2014/02/clip_image00113.jpg "clip_image001[13]") SOA Community
SOA Community Simon Haslam
![clip_image001[14]](http://soacommunity.files.wordpress.com/2014/02/clip_image00114.jpg "clip_image001[14]") SOA Community
SOA Community![clip_image003[2]](http://soacommunity.files.wordpress.com/2014/02/clip_image0032.jpg "clip_image003[2]") OTNArchBeat
OTNArchBeat![clip_image007[1]](http://soacommunity.files.wordpress.com/2014/02/clip_image0071.jpg "clip_image007[1]") Dain Hansen
Dain Hansen![clip_image007[2]](http://soacommunity.files.wordpress.com/2014/02/clip_image0072.jpg "clip_image007[2]") Dain Hansen
Dain Hansen![clip_image001[15]](http://soacommunity.files.wordpress.com/2014/02/clip_image00115.jpg "clip_image001[15]") SOA Community
SOA Community![clip_image001[16]](http://soacommunity.files.wordpress.com/2014/02/clip_image00116.jpg "clip_image001[16]") SOA Community
SOA Community Danilo Schmiedel
 SearchSOA.com
![clip_image003[3]](http://soacommunity.files.wordpress.com/2014/02/clip_image0033.jpg "clip_image003[3]") OTNArchBeat
OTNArchBeat Lonneke Dikmans
 Devoxx4Kids
![clip_image001[17]](http://soacommunity.files.wordpress.com/2014/02/clip_image00117.jpg "clip_image001[17]")
 Vikram@FusionApplied
 Robert van Mölken
![clip_image001[18]](http://soacommunity.files.wordpress.com/2014/02/clip_image00118.jpg "clip_image001[18]") SOA Community
SOA Community Rajesh Raheja
![clip_image016[1]](http://soacommunity.files.wordpress.com/2014/02/clip_image0161.jpg "clip_image016[1]") Danilo Schmiedel
Danilo Schmiedel gschmutz
![clip_image001[19]](http://soacommunity.files.wordpress.com/2014/02/clip_image00119.jpg "clip_image001[19]") SOA Community
SOA Community![clip_image012[1]](http://soacommunity.files.wordpress.com/2014/02/clip_image0121.jpg "clip_image012[1]") Luis Augusto Weir
Luis Augusto Weir![clip_image013[1]](http://soacommunity.files.wordpress.com/2014/02/clip_image0131.jpg "clip_image013[1]")
![clip_image016[2]](http://soacommunity.files.wordpress.com/2014/02/clip_image0162.jpg "clip_image016[2]") Danilo Schmiedel
Danilo Schmiedel demed
demed
 Ronald Rood
![clip_image003[4]](http://soacommunity.files.wordpress.com/2014/02/clip_image0034.jpg "clip_image003[4]") OTNArchBeat
OTNArchBeat Frank Nimphius
![clip_image001[20]](http://soacommunity.files.wordpress.com/2014/02/clip_image00120.jpg "clip_image001[20]") SOA Community
SOA Community![clip_image001[21]](http://soacommunity.files.wordpress.com/2014/02/clip_image00121.jpg "clip_image001[21]") SOA Community
SOA Community![clip_image001[22]](http://soacommunity.files.wordpress.com/2014/02/clip_image00122.jpg "clip_image001[22]") SOA Community
SOA Community Jon petter hjulstad
![clip_image002[1]](http://soacommunity.files.wordpress.com/2014/02/clip_image0021.jpg "clip_image002[1]") SOA Proactive
SOA Proactive![clip_image007[3]](http://soacommunity.files.wordpress.com/2014/02/clip_image0073.jpg "clip_image007[3]") Dain Hansen
Dain Hansen Java Magazin
![clip_image001[23]](http://soacommunity.files.wordpress.com/2014/02/clip_image00123.jpg "clip_image001[23]") SOA Community
SOA Community![clip_image001[24]](http://soacommunity.files.wordpress.com/2014/02/clip_image00124.jpg "clip_image001[24]") SOA Community
SOA Community![clip_image012[2]](http://soacommunity.files.wordpress.com/2014/02/clip_image0122.jpg "clip_image012[2]") Luis Augusto Weir
Luis Augusto Weir![clip_image001[25]](http://soacommunity.files.wordpress.com/2014/02/clip_image00125.jpg "clip_image001[25]")
 OracleBlogs
![clip_image007[4]](http://soacommunity.files.wordpress.com/2014/02/clip_image0074.jpg "clip_image007[4]") Dain Hansen
Dain Hansen![clip_image007[5]](http://soacommunity.files.wordpress.com/2014/02/clip_image0075.jpg "clip_image007[5]") Dain Hansen
Dain Hansen![clip_image007[6]](http://soacommunity.files.wordpress.com/2014/02/clip_image0076.jpg "clip_image007[6]") Dain Hansen
Dain Hansen![clip_image001[26]](http://soacommunity.files.wordpress.com/2014/02/clip_image00126.jpg "clip_image001[26]") SOA Community
SOA Community![clip_image016[3]](http://soacommunity.files.wordpress.com/2014/02/clip_image0163.jpg "clip_image016[3]") Danilo Schmiedel
Danilo Schmiedel


![image[7][2][2][2]](http://soacommunity.files.wordpress.com/2013/04/image7222.png?w=20&h=20&h=20 "image[7][2][2][2]")
![clip_image002[8][4][2][2][2]](http://soacommunity.files.wordpress.com/2013/04/clip_image00284222.jpg?w=26&h=23&h=23 "clip_image002[8][4][2][2][2]")